
Planting
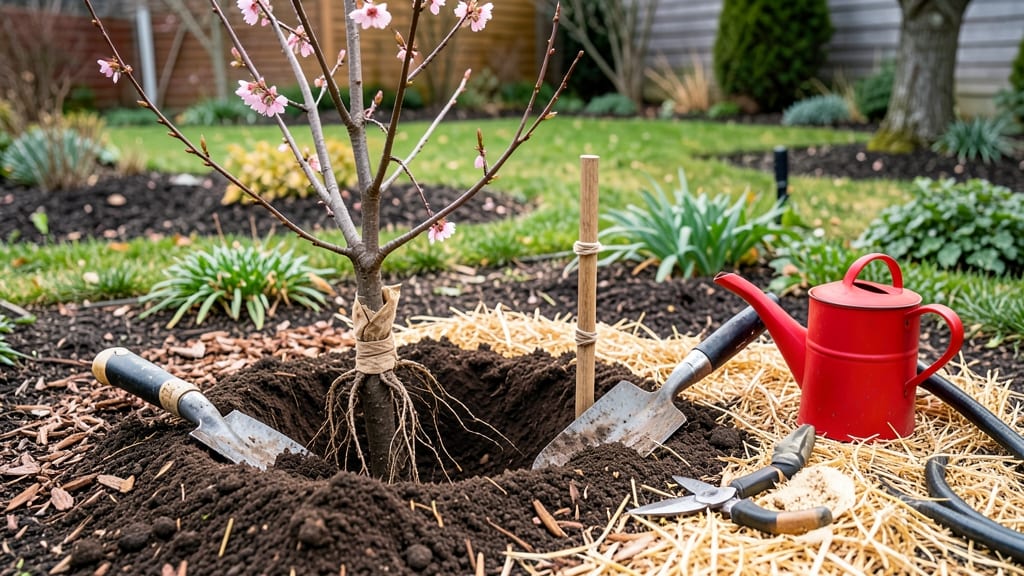
A cherry blossom tree planting guide will turn your yard into a springtime spectacle, as delicate pink blooms take center stage. 🌸 I’ve planted three varieties now—one weeping, one upright—and each time, the pale pink blooms transform my neighborhood for weeks.
The secret starts with soil that drains well but holds moisture, a spot with full sun, and a little patience while roots establish. You’ll need a hole twice as wide as the root ball, amended soil (compost mixed with native dirt), and a sturdy stake if your tree is young.
Digging takes about 30 minutes, but the payoff is decades of blooms. I always plant in early spring or fall, giving roots time to settle before summer heat hits.
Once planted, water deeply for the first two weeks, then taper to 1-2 inches per week—cherry blossoms hate soggy roots but won’t survive drought either. Mulch around the base (but not touching the trunk) to lock in moisture and keep weeds at bay.
Ornamental varieties like ‘Kwanzan’ or ‘Autumn Royal’ dazzle with color, while edible ‘Stella’ produces tiny, tart cherries. Either way, prune in late winter to shape the tree and remove dead wood—just avoid heavy pruning now, or you’ll sacrifice next year’s flowers.
📚 In This Guide
- What you need
- Instructions
- Tips and common mistakes
- Wrapping up and next steps
What you need
- ● Cherry blossom tree (Prunus serrulata or hybrid): Choose a bare-root sapling (1-2 years old) or a container-grown tree (3-5 gallons). Opt for a disease-resistant variety like ‘Kwanzan’ or ‘Yoshino’ for easier care.
- ● Planting hole: Dig a hole 3x wider and slightly shallower than the root ball (for bare-root) or container (for potted trees).
- ● High-quality planting soil or compost: Mix 2 parts native soil with 1 part compost or well-rotted manure for nutrient-rich soil.
- ● Slow-release fertilizer: Use a balanced, organic fertilizer (e.g., 10-10-10 or 5-5-5) with micronutrients like iron and zinc.
- ● Mulch: 3-4 inches of organic mulch (wood chips, straw, or shredded bark) to retain moisture and suppress weeds.
- ● Shovel or spade: For digging the planting hole.
- ● Garden trowel: For adjusting roots or loosening soil.
- ● Pruners or shears: To trim any damaged roots or branches.
- ● Watering can or hose: With a gentle spray nozzle for post-planting hydration.
- ● Garden gloves: To protect your hands from thorns and dirt.
- ● Measuring tape or ruler: To ensure proper hole depth and spacing.
- ● Sunlight: Full sun (6+ hours/day) is a must—cherry blossoms thrive in bright, open spaces!
- ● Well-draining soil: Avoid heavy clay or waterlogged areas. Amend soil if needed.
- ● Spacious yard: Plant at least 20-30 feet from structures, sidewalks, or other trees to allow for mature growth.
- ● Local climate check: Cherry blossoms prefer USDA Zones 5-8 and need chilling hours (300-1,000) for blooming.
- ● Tree stake and ties: For young trees in windy areas.
- ● Soil moisture meter: To monitor hydration levels.
- ● Drip irrigation system: For consistent watering.
- ● Tree guard or protective fence: To shield from pets or wildlife.
Step-by-step instructions for planting a cherry blossom tree
Here's how to plant your cherry blossom tree so it thrives and blooms beautifully for decades.
🌱 Step 1: Choose the Perfect Planting Spot
Cherry blossoms need full sun—at least 6 hours of direct sunlight daily—to produce their stunning spring blooms. I always pick a location that gets morning sun and afternoon shade, especially in hotter climates, to prevent stress on the tree. Avoid low spots where water pools, as soggy roots invite rot.
Check the mature size of your tree (some varieties reach 25-30 feet tall), and give it plenty of room to grow. Plant at least 15 feet away from sidewalks or structures to avoid root conflicts later. If you're planting near a driveway, consider a dwarf variety like 'Royal Celebration' that stays under 20 feet tall.
🪴 Step 2: Dig the Hole and Prepare the Soil
Dig a hole that's twice as wide as the root ball but no deeper—this encourages roots to spread outward rather than growing downward in search of nutrients. Loosen the soil at the bottom of the hole with a shovel or your hands to help roots penetrate easily. Avoid amending the soil with compost or fertilizer at planting time; it can burn tender roots.
Gently remove the tree from its container and inspect the roots. If they're circling or tangled, use your hands to loosen them slightly. Place the tree in the hole so the top of the root ball sits 1-2 inches above ground level—this prevents water from pooling at the base and causing rot. The graft union (a visible bump or ring near the base) should be 2-3 inches above the soil line.
💧 Step 3: Plant and Water Thoroughly
Backfill the hole with the native soil, tamping it down gently in layers to remove air pockets. Press firmly but don’t compact the soil too tightly—roots need room to grow. Once planted, water deeply to settle the soil around the roots. You’ll know it’s right when water drains evenly and the soil feels moist 6 inches down.
Mulch the area with 2-3 inches of organic mulch (like wood chips), keeping it 3 inches away from the trunk to prevent rot. Water again after mulching to help it settle. In the first year, water once a week if rainfall is less than 1 inch per week, and twice a week during dry spells to encourage strong root growth.
☀️ Step 4: Support and Protect the New Tree
Stake the tree only if it’s top-heavy or in a windy location. Use 2 stakes positioned 6 inches from the trunk and tie the tree loosely with soft fabric strips—tighten as the tree grows but never restrict movement. Prune only to remove any broken branches or suckers growing from the base, which divert energy from the main trunk.
Watch for signs of stress like yellowing leaves or wilting, which can signal overwatering or underwatering. Cherry blossoms are sensitive to salt buildup, so avoid fertilizing for the first year. Instead, focus on keeping the soil consistently moist and providing gentle care. You’ll see new growth in 4-6 weeks, signaling the tree has taken root successfully.
⏰ Step 5: Plan for Long-Term Care
Cherry blossoms bloom best when they’re healthy and well-established. In early spring, before buds swell, apply a slow-release fertilizer to encourage vibrant blooms. Prune lightly after flowering to shape the tree and remove any dead or crossing branches. Avoid heavy pruning, as it reduces next year’s blossoms.
These trees thrive with minimal intervention once established. Just keep an eye out for pests like aphids or diseases like powdery mildew, and treat them early with horticultural oil or fungicide. With proper care, your cherry blossom will reward you with spectacular spring blooms for decades—and maybe even a few edible cherries if you choose a fruiting variety!
Tips & tricks for perfect cherry blossom tree planting
These simple yet game-changing tips will help your cherry blossom tree take root and flourish for years to come.
Sunlight Strategy: While the instructions call for at least 6 hours of sun daily, I've found that morning sun (before 10 AM) is most critical for those delicate blossoms. If your yard gets intense afternoon sun, consider planting on the east side of structures to shield from the hottest hours. This balance prevents leaf scorch while still giving you those stunning spring blooms.
Root Ball Prep: Before planting, soak the root ball for 15-30 minutes in a bucket of water. This helps hydrate the roots and reduces transplant shock. After planting, I like to add a handful of mycorrhizal fungi to the backfill soil—these beneficial fungi help roots absorb nutrients more efficiently. Just sprinkle it around the roots before backfilling.
Watering Wisdom: The instructions mention watering once or twice weekly, but I've learned that deep, infrequent watering is better than frequent shallow watering. After your initial deep watering, let the top 2 inches of soil dry out between waterings. This encourages roots to grow deeper rather than staying shallow. A soil moisture meter makes this easy to track.
Mulch Matters: While 2-3 inches of mulch is ideal, I've found that adding a layer of coarse wood chips helps retain moisture better than finer mulches. Just make sure to keep that mulch 3 inches away from the trunk to prevent rot. In winter, I add an extra 1-2 inches of mulch to insulate roots from freezing temperatures.
Pro Tips for Cherry Blossom Tree Planting Guide
- These simple yet game-changing tips will help your cherry blossom tree take root and flourish for years to come.
- Sunlight Strategy: While the instructions call for at least 6 hours of sun daily, I've found that morning sun (before 10 AM) is most critical for those delicate blossoms.
- Root Ball Prep: Before planting, soak the root ball for 15-30 minutes in a bucket of water.
Frequently asked questions
When is the best time to plant a cherry blossom tree?
The ideal time to plant is late fall or early spring (before buds swell). This gives roots time to establish before summer heat. Avoid planting in extreme temperatures—cherry blossoms are sensitive to frost and scorching sun. If you must plant in summer, keep the soil moist and mulch heavily to protect roots.
How far apart should I plant multiple cherry blossom trees?
Space trees 20–30 feet apart for mature canopies (they grow 20–40 feet wide!). If planting near a fence or wall, leave at least 10–15 feet of clearance. Overcrowding leads to poor air circulation, increasing disease risk. For dwarf varieties, reduce spacing to 10–15 feet.
How often should I water a newly planted cherry blossom tree?
Water deeply 2–3 times per week for the first year, soaking the root zone (12–18 inches down). After establishment, water 1–2 times weekly during dry spells. Mulch (2–4 inches) retains moisture and regulates soil temperature. Avoid wetting leaves to prevent fungal diseases like powdery mildew.
Can I grow a cherry blossom tree in a pot or small yard?
Most cherry blossoms need full sun and space, but dwarf varieties (like Prunus × yedoensis) thrive in large containers (15+ gallons). Ensure pots have drainage holes and use well-draining soil. In small yards, consider espalier training or a weeping cherry (e.g., Prunus subhirtella ‘Pendula’) for compact growth.
Why aren’t my cherry blossom tree’s flowers opening this spring?
Common culprits include late frost (damages buds), poor pollination (plant two varieties nearby), or nutrient deficiencies (test soil pH; ideal range: 6.0–7.0). Over-fertilizing with nitrogen can also reduce blooms. Prune dead branches in late winter to encourage new growth. If issues persist, consult a local arborist.
Do cherry blossom trees attract pests or diseases?
Yes! Watch for Japanese beetles, aphids, or borers. Prevent pests with neem oil or insecticidal soap. Diseases like black knot or canker thrive in wet conditions—prune infected branches immediately and sterilize tools. Choose resistant varieties (e.g., Prunus avium ‘Kanzan’) for low-maintenance blooms.
Wrapping up and next steps
Planting a cherry blossom tree is more than just adding beauty to your yard—it’s about creating a lasting legacy of color, fragrance, and joy for years to come. 🌸 With the right soil, timing, and care, your tree will thrive and reward you with breathtaking spring blooms.
Whether you’re a gardening pro or a beginner, now’s the perfect time to roll up your sleeves and get planting!
Ready to take the next step? Start by choosing your variety—whether it’s a classic Prunus serrulata or a hardy hybrid—and mark your calendar for early spring or fall planting. Then, gather your tools, dig in, and let the magic of cherry blossoms transform your outdoor space! 🌱