
Propagation
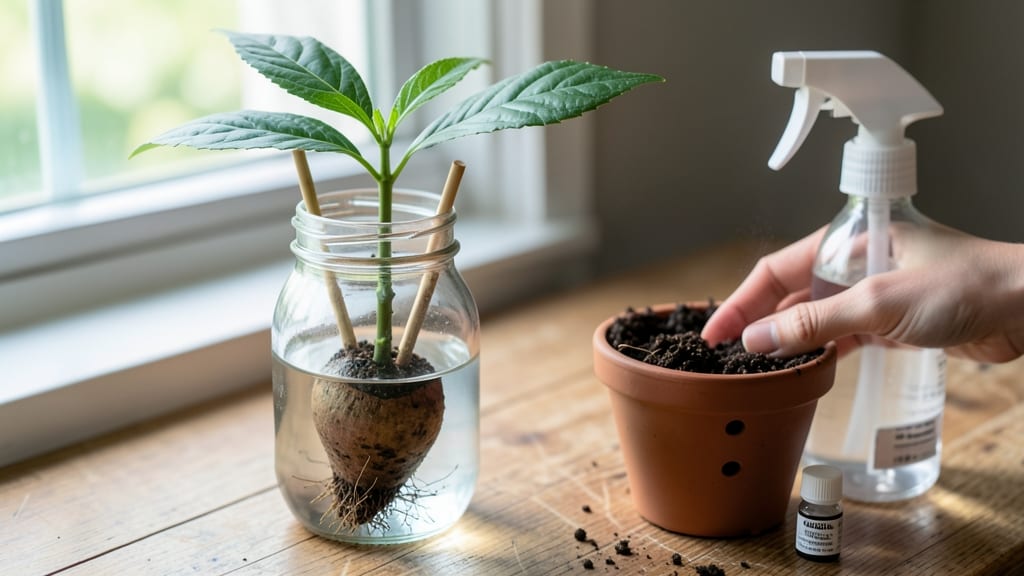
Growing an avocado tree from an avocado pit is the easiest houseplant project that actually works. 🌱 I've sprouted dozens—some thrived, others taught me lessons (like why I shouldn't rush the process)—but the ones I nurtured carefully now stand over 5 feet tall in my kitchen.
The key isn't magic; it's patience and understanding what the pit needs to break dormancy.
Start with a fresh pit, clean and dry, then suspend it in water with just the bottom third submerged. Change the water every 2-3 days to prevent mold, and within 3-6 weeks, you'll see roots emerge.
The first sign is usually a tiny white root poking out—this is your reward for waiting. Most people quit here, but true success comes when those roots reach 3-4 inches before transplanting.
Once roots appear, move your seedling to soil when it's about 6 inches tall, and watch it grow into a real tree. With proper light and care, you'll see new leaves every few months, and within a year, it could be 2-3 feet tall.
The best part? Even if it never bears fruit (yes, it might not), the lush green foliage makes any room feel like a tropical escape.
Here's the thing—this project works best with warmth and consistency. Avocado trees hate drafts and temperature swings, so place yours near a sunny window or under a grow light. And if you're wondering about fruit?
Don't hold your breath—it takes 10-15 years for a homegrown avocado to bear fruit, but the journey is worth it for the lessons (and the plant).
📚 In This Guide
- What you need
- Instructions
- Tips and common mistakes
- Wrapping up and next steps
What you need
- ● Avocado pit: 1 fresh, organic pit (avoid store-bought pits treated with fungicides)
- ● Toothpicks or clean chopsticks: 3-4 (for suspending the pit)
- ● Small glass or jar: 1 (wide-mouth, 8–16 oz, like a mason jar)
- ● Water: Distilled or tap water (room temperature, ~70°F)
- ● Paper towels: 1-2 sheets (for moisture control)
- ● Potting soil: 1 bag (well-draining, peat-based or cactus mix)
- ● Small pot: 1 (4–6 inches wide, with drainage holes)
- ● Spray bottle: 1 (for gentle watering)
- ○ Fertilizer (optional): Balanced liquid fertilizer (5-5-5 NPK ratio, diluted)
- ● Grow lights or sunny windowsill: 1 (south-facing window or LED grow bulb)
- ● 🔥 Patience is key: Sprouting can take 2–8 weeks—stay consistent!
- ● 🌡️ Temperature matters: Keep water between 65–75°F for optimal growth.
- ● ✨ No soil? No problem: Use a water-only method until roots are 2–3 inches long.
Step-by-step instructions for growing an avocado tree from a pit
Here's my foolproof method for turning a humble pit into a thriving houseplant.
🌱 Step 1: Prepare the Avocado Pit for Germination
Start with a fresh avocado pit—one you've eaten within the last week works best. Rinse it thoroughly to remove any fruit residue, then use a sharp knife to carefully slice off the pointed end. You'll reveal a small, dark brown nut inside—this is the embryo we want to coax into growth.
Insert three toothpicks around the pit, spaced evenly about ½ inch apart along the middle. These will suspend the pit over a glass of water without letting it touch the bottom. The toothpicks should be positioned so the flat side of the pit faces the water—this is where the roots will emerge. Fill a glass with 2-3 inches of water, just enough to submerge the bottom ¼ inch of the pit.
Place the glass in a warm spot with bright, indirect light—a kitchen windowsill or under a grow light works perfectly. You'll see roots appear in 2-6 weeks, depending on the pit's freshness. Keep the water level consistent, adding more as needed to maintain that ¼ inch submersion. Never let the pit dry out completely.
💧 Step 2: Wait for Roots and Prepare the Soil
Once roots reach about 2 inches long, it's time to plant. I like to wait until I see at least two or three roots—this gives the pit a better chance of establishing itself in soil. While waiting, prepare your planting container with well-draining potting mix mixed with 20% perlite or coarse sand to prevent waterlogging.
Choose a container with drainage holes that's at least 6 inches deep—avocado roots need room to grow downward. Fill the bottom ¼ full with the soil mix, then create a small mound in the center. This mound will help position the pit so the roots grow downward naturally. Moisten the soil lightly with water until it's damp but not soggy.
Here's the thing—don't rush this step. If your roots are still short, let them grow a bit longer. The longer the roots, the stronger the initial transplant. You'll know it's time to plant when the roots are thick enough to handle gentle handling without breaking.
☀️ Step 3: Plant the Rooted Pit and Encourage Growth
Remove the pit from the water and gently place it on the soil mound, ensuring the roots dangle down into the soil. The top of the pit should sit just above the soil line—never bury it completely. The flat side (where the embryo was) should face downward. Gently press the soil around the base of the pit to secure it in place.
Water lightly until the soil is evenly moist, but don't drown it. Avocado trees hate soggy roots, so always let the top inch of soil dry out slightly between waterings. Place the container in a spot with bright, indirect light—direct sun can scorch the young leaves. You'll see the first true leaves emerge in 2-4 weeks, signaling successful growth.
This is the moment that matters: Once the first leaves appear, you can gradually introduce more light. After a week, move the plant to a location with 4-6 hours of morning sun. Avoid afternoon sun until the plant is at least 6 inches tall. You'll notice new leaves developing every few weeks as the tree grows.
✂️ Step 4: Maintain and Prune for a Strong Sapling
After 3-4 months, your avocado tree will need pruning to encourage bushier growth. When the plant reaches about 12 inches tall, pinch off the top set of leaves just above a leaf node. This encourages the tree to branch out instead of growing tall and leggy. You'll see new side shoots emerge within 2-3 weeks.
Continue to water when the top inch of soil feels dry to the touch. Avocado trees are drought-tolerant once established, but young plants need consistent moisture. Fertilize lightly every 2 months with a balanced, water-soluble fertilizer diluted to half strength. Over-fertilizing can burn the roots, so less is more here.
Real talk: Your sapling might not fruit for several years, but that doesn't mean it's failing. Focus on keeping the leaves healthy and vibrant. Yellow leaves usually indicate overwatering, while brown, crispy leaves mean underwatering or too much sun. Adjust your care based on what you observe—this is how you learn what your specific plant needs.
Tips & tricks for growing an avocado tree from a pit
Here's what nobody tells you—your avocado tree's success starts with these small but crucial details.
Germination Setup: The toothpick placement matters more than you think. Position them so the flat side of the pit faces down—this is where the roots will emerge. I've seen people place the pit with the curved side down, which can slow growth. Also, use toothpicks that are ½ inch apart—any closer and they might not suspend properly, any farther and the pit could wobble too much.
Root Growth Strategy: Don't be impatient! Those 2-6 weeks for roots to appear can feel like forever, but longer roots mean a stronger transplant. I've had pits with 1-inch roots establish better than those with just ½-inch roots. The key is consistency—keep that ¼ inch of the pit submerged in water at all times. If you notice the water getting cloudy, change it to prevent bacterial growth that could harm your roots.
Planting Position: The soil mound technique in Step 2 is your secret weapon. That ¼ full initial soil layer plus the mound creates perfect downward root growth. When planting, angle the roots slightly downward rather than letting them flop straight down—this encourages them to grow into the soil instead of curling back up. And remember, the top of the pit should always stay above soil level.
Light Transition: The 2-4 weeks for first leaves to appear is exciting, but don't rush the light transition. Start with just 4-6 hours of morning sun—afternoon sun can scorch tender new leaves. I've seen people move their plants too quickly to full sun and end up with brown, crispy leaves. Gradual exposure is key—think of it like sunbathing for the first time after winter!
Pro Tips for Growing An Avocado Tree From An Avocado Pit
- Here's what nobody tells you—your avocado tree's success starts with these small but crucial details.
- Germination Setup: The toothpick placement matters more than you think.
- Root Growth Strategy: Don't be impatient!
Frequently asked questions
Got questions? You’re not alone—growing an avocado tree from a pit is exciting, but it’s natural to have doubts! Here are answers to the most common ones to keep your green thumb thriving.
How long does it take for an avocado pit to sprout?
Patience is key! With the right conditions (warmth, moisture, and consistency), you’ll see tiny roots in 2–6 weeks. Once rooted, transfer to soil—it may take months to years for fruit-bearing maturity (if indoors). Outdoor trees in warm climates can produce avocados in 3–5 years!
Can I grow an avocado tree indoors?
Many growers keep their avocado trees indoors as houseplants. Place it near a sunny window (south-facing is ideal) and rotate it weekly for even growth. Just ensure it’s not drafty—avocados hate cold! With proper care, indoor trees can live for decades (though fruiting is rare).
Why is my avocado pit rotting or moldy?
Mold or rot usually means too much moisture or poor drainage. If you see slimy pits or foul smells, drain excess water and refresh the toothpick setup. Use chlorinated water (like tap water) sparingly—distilled water can encourage bacteria. Keep the pit half-submerged in water only!
What’s the best soil mix for an avocado sapling?
Start with a well-draining potting mix (like cactus/succulent blend) and add perlite or sand (20%) to prevent root rot. Avocados thrive in slightly acidic soil (pH 6.0–7.0). Avoid heavy garden soil—it compacted too easily. Repot every 1–2 years as your tree grows!
Will my avocado tree ever produce fruit?
Indoor trees rarely fruit (they need 12+ hours of sunlight daily and pollination), but outdoor trees in USDA Zones 9–11 can! Even if it doesn’t fruit, enjoy the lush, tropical vibes—and share your journey with friends. Pro tip: If you live in a cold climate, grow it in a container and bring it inside during winter!
Wrapping up and next steps
Growing an avocado tree from a pit is a rewarding journey that teaches patience, care, and the joy of nurturing life. While it may take years for your sapling to bear fruit, the process itself is a fun, educational, and low-cost project that connects you to nature.
Now that you’ve mastered the basics, why not expand your green thumb?
🌱 Next Steps to Try:
- Experiment with different avocado varieties (like Hass or Fuerte) to see which thrives best in your climate.
- Learn about transplanting seedlings into soil or pots for long-term growth.
- Share your progress with fellow plant enthusiasts—tag us on social media! 📸
Your little avocado adventurer is just the beginning—keep growing, stay curious, and watch your green dreams take root! 🌿