
Pruning
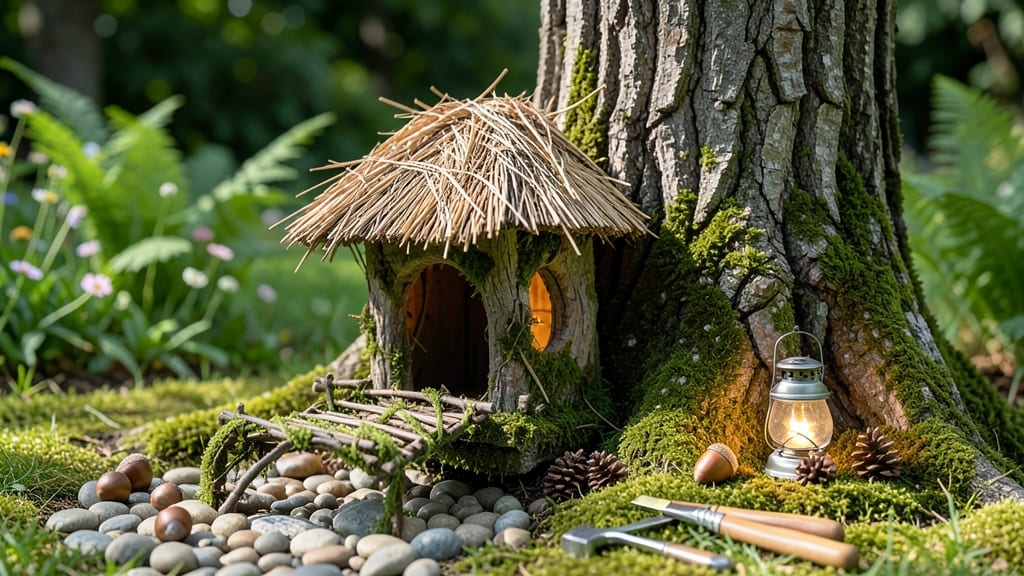
A tree trunk becomes the heart of a magical garden story. ✨ Turning a fallen log into a fairy house isn't just whimsy—it's a way to transform an ordinary yard into a secret woodland retreat where kids and adults alike can wander.
The best part? You don't need fancy skills or expensive materials to create something that feels like it belongs in a storybook.
The magic starts with the right trunk—look for one with natural hollows or crevices that can become doorways, windows, or hidden nooks. A 12- to 18-inch diameter log works perfectly for a fairy-sized home, while smaller branches can become furniture or bridges.
Gather moss, pebbles, and tiny flowers from your garden to dress it up, and let your imagination run wild with paint or natural stains for that extra touch of charm.
What you end up with is a garden focal point that sparks joy every time you walk by. Kids will spend hours "living" in their fairy world, and you'll have a conversation starter that makes your garden feel like a living fairy tale.
The best part? It blends seamlessly into woodland, cottage, or fantasy garden themes, adding a touch of magic without overwhelming your space.
Works for any outdoor space—backyards, patios, or even as a container garden centerpiece. Here's how to bring the magic to life without breaking the bank or the rules.
📚 In This Guide
- What you need
- Instructions
- Tips and common mistakes
- Wrapping up and next steps
What you need
- ● Tree trunk: A medium-sized, sturdy trunk (4–8 inches in diameter) with natural hollows or crevices. Choose one with bark texture for rustic charm.
- ● Natural roofing: Moss (2–3 cups, fresh or dried)
- ● Shingles or bark slices (5–10 pieces, ~3" x 6")
- ● Small pinecones (3–5, for decorative accents)
- ● Miniature furniture: Twigs (for chairs, tables, or ladders)
- ● Acorns or small stones (as "rocks" or steps)
- ● Dried leaves or flower petals (for flooring or pathways)
- ● Adhesives: Natural glue (e.g., white glue or hot glue gun) or wood glue for securing elements.
- ● Pruning shears (for shaping twigs or moss)
- ○ Small paintbrush (for glue application or optional paint)
- ● Spray bottle (to mist moss and keep it fresh)
- ○ Optional: Acrylic paint (for details, if desired)
- ● Twine or yarn (for curtains or fences)
- ● Miniature fairy lights (solar-powered for safety)
Step-by-step instructions for building a fairy house tree trunk
Here's how to create a magical garden centerpiece that sparks joy and invites fairy visitors.
🪴 Step 1: Select and Prepare Your Tree Trunk
Choose a 4-6 foot long trunk with a 6-12 inch diameter—thicker trunks create more dramatic nooks. Look for one with natural crevices or hollows that can become doorways or windows. Clean the trunk thoroughly with a wire brush to remove loose bark and debris, then disinfect with a 1:10 bleach-water solution to prevent mold.
Let the trunk dry completely in sunlight for 2-3 days before assembly. If the bark is peeling, gently remove it to expose clean wood—this creates a perfect surface for painting or attaching decorations. I like to sand rough edges with 80-grit sandpaper for a smoother finish, especially where fairy furniture will rest.
🌿 Step 2: Design the Fairy House Layout
Sketch a simple floor plan on paper first. A classic fairy house has a roof with a slight overhang, at least one door, and 2-3 windows. Use a pencil and ruler to mark measurements directly on the trunk—most fairy houses fit comfortably on a 12-18 inch section of the trunk. I often add a tiny chimney on one side for that cozy touch.
For hidden nooks, look for natural indentations or carve shallow recesses with a wood carving knife (about ½ inch deep). These become perfect spots for a tiny table, bench, or even a fairy-sized garden. Keep proportions in mind: a 1-inch doorway feels just right for fairy-sized visitors.
✂️ Step 3: Build the Roof and Structural Elements
Cut roof pieces from ½-inch thick plywood or cedar planks to match your design. A simple gabled roof (triangular shape) works best for fairy houses. Sand all edges smooth and paint them with non-toxic outdoor acrylic paint in earthy tones like moss green or slate gray. Let dry completely before attaching.
Use waterproof wood glue and small finishing nails (or a hot glue gun for lighter pieces) to secure the roof. Angle it slightly forward so rainwater runs off easily. For extra durability, seal all wood parts with outdoor wood sealant—this protects against moisture while keeping the fairy house looking fresh for years.
🎨 Step 4: Add Decorative Details and Furniture
Paint the trunk and structural elements with light, airy colors—think pastel blues, soft pinks, or weathered whites. Use a fine paintbrush for intricate details like shutters, latticework, or tiny flower boxes. For texture, mix acrylic paint with a bit of sand to create a stone-like surface for walls or foundations.
Create miniature furniture from balsa wood or lightweight foam. A tiny table, chair, or bench can be made from scraps cut with a craft knife. Position these inside your fairy house using pegs or small dowels to keep them stable. Add moss, pebbles, or tiny flowers from your garden to bring the scene to life.
☀️ Step 5: Place and Maintain Your Fairy House
Position your fairy house tree trunk in a shaded garden spot where it receives dappled sunlight—this preserves the paint and keeps the fairies comfortable. Anchor it securely in the ground with stakes or rocks to prevent tipping, especially if you live in a windy area. Surround it with small plants or fairy-sized landscaping like tiny mushrooms or toadstools.
Check your fairy house once a month to touch up paint or adjust decorations. If rain washes away details, use a soft brush and diluted paint to refresh them. Over time, the trunk will weather naturally—embrace the patina as part of the charm! For extra magic, add tiny LED tea lights inside the windows for a glowing effect at night.
Tips & tricks for perfect fairy house tree trunks
Here's what nobody tells you about building a fairy house that'll stand the test of time—and fairy inspections.
Material Matters: Don't underestimate the importance of your tree trunk's condition. Look for one with natural character—small cracks or hollows that can become doorways or secret gardens. If your trunk has loose bark, remove it completely rather than forcing decorations over it. I've learned this the hard way after trying to attach shutters to peeling bark that kept flaking off. Also, avoid freshly cut trunks—they contain too much moisture and can warp as they dry.
Design First, Build Second: Sketch your layout on paper before marking the trunk. I can't stress this enough—once you start carving or painting, it's hard to undo mistakes. Draw to scale using the 12-18 inch section guideline, and mark your door (aim for that perfect 1-inch width) and windows first. Pro tip: Use a pencil with a fine point for precise lines, and keep your ruler handy to maintain those fairy-sized proportions throughout.
Roofing Secrets: The roof is where most fairy house builders stumble. For a truly magical look, create a slight overhang (about ½ inch) that extends beyond the trunk's edges. This not only looks charming but also protects the interior from rain. When attaching, use waterproof wood glue and small finishing nails—hot glue guns work too, but they're less durable outdoors. Seal all wood parts with outdoor wood sealant after assembly to prevent moisture damage, which will keep your fairy house looking fresh for years.
Weatherproofing: Position your fairy house in a shaded spot with dappled sunlight to preserve paint and keep fairies comfortable. I've seen beautiful fairy houses ruined by direct sun that faded their paint in weeks. For extra protection, consider adding a tiny overhang to the roof or using UV-resistant outdoor paint. And here's a little-known trick: Place a small piece of felt or weatherstripping around the base to protect against moisture wicking from the ground.
Pro Tips for Fairy House Tree Trunk
- Here's what nobody tells you about building a fairy house that'll stand the test of time—and fairy inspections.
- Material Matters: Don't underestimate the importance of your tree trunk's condition.
- Design First, Build Second: Sketch your layout on paper before marking the trunk.
Frequently asked questions
Got questions about creating your own fairy house tree trunk? You’re not alone—this magical project sparks curiosity! Here are some of the most common queries to help you craft the perfect whimsical hideaway:
How do I choose the right tree trunk for a fairy house?
A hollowed or naturally textured trunk (like oak, maple, or birch) works best—look for one with a gentle curve or nooks for extra charm. Avoid rotten wood (it’s unsafe and won’t last). If your trunk is too small, stack smaller logs or use a fake tree stump from craft stores!
How long does it take to build a fairy house tree trunk?
That depends on your skill level! A simple design with basic tools can take 1–2 hours, while intricate details (like moss roofs or tiny fences) may require 3–5 hours or even a weekend. Pro tip: Start small—practice on a scrap piece of wood first!
What are some easy alternatives if I don’t have a real tree trunk?
No problem! Try these budget-friendly swaps:
- Cinder blocks painted to look like wood
- Large cardboard tubes (from paper towel rolls or shipping)
- Faux logs (available at garden centers)
- Terracotta pots stacked or carved
Will bugs or animals move into my fairy house?
It’s possible! To keep critters out:
- Use non-toxic wood sealant to deter insects
- Avoid deep crevices where spiders or ants might nest
- Add a tiny "do not disturb" sign (kids love this!) to humorously "warn" them
How do I protect my fairy house from rain or snow?
Outdoor fairy houses need a little TLC to last. Seal wood with waterproof varnish or mod podge, and add a roof (even a mini umbrella or bark shingle). For snow, gently brush it off or place the trunk under a porch or awning. Pro move: Store delicate decorations indoors during harsh weather!
Wrapping up and next steps
Transforming a tree trunk into a fairy house isn’t just a creative project—it’s a chance to breathe life into your garden with magic and charm! 🌿✨ Whether you’re a pruning pro or a beginner, this whimsical focal point adds personality to your outdoor space while honing your DIY skills.
Ready to take the next step? Start small with a single trunk, then expand your fairy garden with pathways, tiny bridges, or even a miniature village. The possibilities are endless—let your imagination run wild!