
Pruning
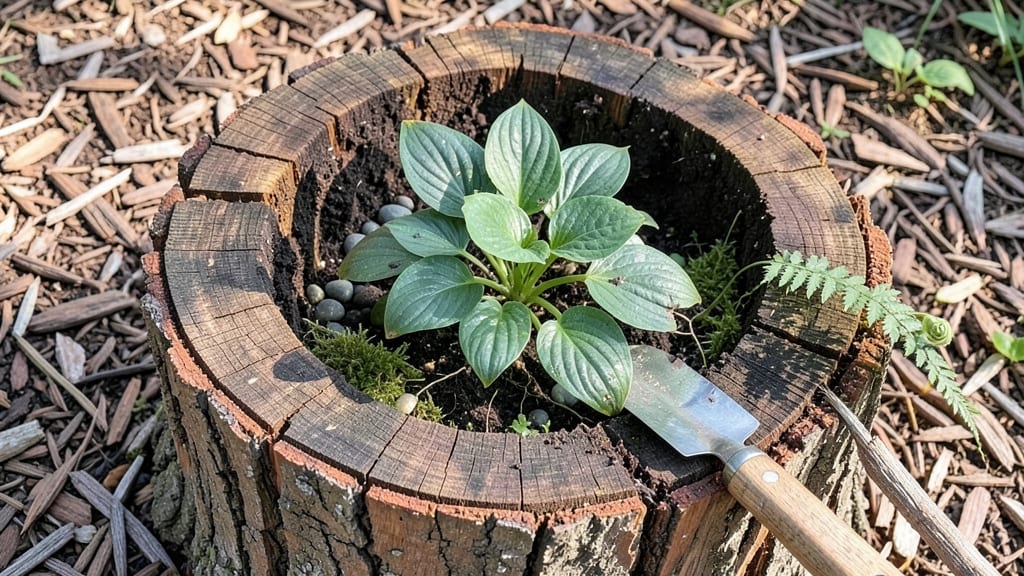
A hollowed-out tree stump planter turns old wood into a living centerpiece that’s equal parts functional and stunning. 🌿 I’ve transformed three stumps in my own yard—each one now overflowing with ferns, moss, or trailing ivy—and they’ve become the garden’s most photographed feature.
The best part? It’s a project that’s as rewarding to make as it is to maintain.
You’ll need basic tools—a chainsaw (or drill for smaller stumps), a mallet, landscape fabric, and potting soil—but the real magic happens in the plant selection. Succulents thrive in the dry, shaded conditions, while ferns and hostas love the moisture-retaining environment.
For extra drama, paint the stump’s exterior with non-toxic outdoor paint or leave it natural for a true woodland vibe.
Once filled, your stump planter will age beautifully over time, its bark softening and plants spilling over the edges. The key to longevity? Proper drainage—drill holes in the bottom if your stump isn’t naturally porous—and a watering routine that mimics the forest floor: keep it damp but never soggy.
In just a few weeks, you’ll have a living sculpture that’s far more impressive than any store-bought pot.
Want to take it further? Stack two stumps for a tiered look, or carve simple designs into the wood before planting. These planters work in cottage gardens, modern landscapes, or even as a whimsical patio feature. The possibilities are as endless as your creativity—and your yard’s empty corners.
📚 In This Guide
- What you need
- Instructions
- Tips and common mistakes
- Wrapping up and next steps
What you need
- ● Hollowed-out tree stump: A sturdy, dry stump (at least 12–18 inches in diameter) with a clean, hollow center. Pro tip: Sand down rough edges for safety!
- ● Drainage material: 1–2 inches of gravel or crushed stone (for drainage)
- ○ Optional: Perlite or hydroponic clay pebbles (for extra aeration)
- ● Potting soil: 2–3 bags of well-draining potting mix (avoid garden soil—it compacts easily!).
- ● Plants: Choose stump-friendly plants like succulents, ferns, or small shrubs (avoid heavy rooters).
- ● Tools: Safety gloves & goggles (for handling rough edges)
- ● Sandpaper (80–120 grit) or an electric sander
- ● Paintbrush or stain applicator (if decorating)
- ● Watering can or hose with a gentle spray nozzle
- ● Decorative touches: Outdoor paint (non-toxic, weather-resistant)
- ● Stencils or wood-burning tool (for custom designs)
- ● Moss or lichen (for a natural, textured look)
- ● Functional upgrades: Drip irrigation kit (for low-maintenance watering)
- ● Lightweight plastic liner (to prevent soil spills)
Step-by-Step instructions for creating a hollowed-out tree stump planter
Turn a fallen tree stump into a charming, functional planter with these straightforward steps.
🪴 Step 1: Prepare the Stump for Safety and Drainage
Start by ensuring the stump is completely dry and free of any rot or pests. Use a drill with a 1-inch bit to create multiple drainage holes along the bottom and sides—aim for at least 4 holes spaced evenly. This prevents waterlogging, which can rot roots and attract mosquitoes. I like to work in a well-ventilated area while drilling, as wood dust can be irritating.
Next, rough up the interior walls with a chisel or sandpaper to create texture for better root grip. Smooth edges with a file or sandpaper to avoid splinters. If the stump has a natural lip at the top, leave it intact—it’ll help contain soil. For extra stability, place the stump on a 4-inch layer of landscape fabric before filling with soil to block weeds and improve drainage.
🌱 Step 2: Line the Interior and Add Soil
Cut a piece of landscape fabric to fit snugly inside the stump, leaving a 2-inch overhang at the top to secure it. This fabric keeps soil from escaping through drainage holes while allowing excess water to drain. Fold the overhang inward and tuck it under the soil layer later. For a 4-stump project, you’ll need about 1 square yard of fabric total.
Fill the stump with a well-draining potting mix—avoid garden soil, which compacts and suffocates roots. I blend equal parts potting mix and perlite for extra aeration. Leave 1 inch of space at the top to accommodate watering and prevent spills. Gently press the soil down to eliminate air pockets, but don’t compact it too tightly.
✂️ Step 3: Plant and Arrange Your Garden
Choose plants that thrive in shallow root environments, like succulents, ferns, or ornamental grasses. For a 4-stump setup, I recommend 3-5 plants per stump, depending on size. Dig small holes in the soil, just deep enough to accommodate the root balls without burying the stems. Gently remove plants from their nursery pots and place them in the holes, then backfill with soil.
Arrange plants with their most attractive foliage or flowers facing outward to create visual interest. Group taller plants toward the center and shorter ones toward the edges. Water thoroughly after planting to settle the soil and encourage root contact. Avoid overwatering—stumps dry out faster than ground-level planters, so check soil moisture daily for the first week.
☀️ Step 4: Position and Maintain Your Stump Planters
Place your stump planters in a location with partial shade to full sun, depending on your plants’ needs. Succulents and drought-tolerant plants can handle direct sunlight, while ferns and hostas prefer morning sun and afternoon shade. Elevate stumps on small bricks or pavers to improve drainage and prevent water pooling beneath them.
Water deeply 2-3 times per week, adjusting for rainfall. Stumps dry out quickly, so check the soil with your finger—top 1 inch should feel dry before watering again. Apply a 2-inch layer of mulch around the base (not inside) to retain moisture and suppress weeds. Replenish mulch seasonally, and fertilize lightly every 4-6 weeks with a balanced, slow-release fertilizer.
🌿 Step 5: Refresh and Rotate Plants Seasonally
Every 2-3 months, remove spent or overgrown plants and replace them with new varieties to keep your stump planters looking fresh. This also prevents overcrowding and gives roots room to breathe. I like to swap out summer annuals for cool-season plants in fall, like pansies or dusty miller, to extend the growing season.
Clean out debris annually—remove old mulch, pull weeds, and refresh the soil with a top dressing of compost. If drainage slows over time, re-drill holes or add a layer of coarse sand to the bottom before refilling with soil. With proper care, your stump planters will become a long-lasting, rustic centerpiece that evolves with each season.
Tips & tricks for perfect tree stump planters
These practical tips will help you transform your stump into a thriving, long-lasting garden feature with minimal hassle.
Drainage Design: When creating those at least 4 drainage holes in Step 1, space them strategically—place two on opposite sides near the bottom and two higher up the sides. This creates a cross-drainage system that prevents water from pooling at the base, which is crucial for root health. I also recommend angling the holes slightly upward to encourage water flow away from the stump's center.
Texture Tip for Root Grip: The rough-up step in Step 1 isn't just about aesthetics—it's about creating micro-crevices where roots can anchor. Use a medium-grit sandpaper (around 80-100 grit) for this task. Too fine, and you won't get enough texture; too coarse, and you risk creating splinter hazards. Test the texture by running your fingers along the wall—it should feel like lightly sanded wood, not smooth or jagged.
Soil Mix Strategy: While the instructions recommend equal parts potting mix and perlite, I've found that adding 10% coconut coir to the mix improves moisture retention without sacrificing drainage. This is particularly helpful in the first few weeks when establishing new plants. The coir also adds beneficial microbes that support root development. Remember to keep that 1-inch headspace at the top—this prevents soil from spilling when you water.
Plant Selection Pro Tip: For your 3-5 plants per stump recommendation in Step 3, consider the mature size of your selections. Group plants with similar water needs together—place drought-tolerant succulents near the edges where they'll get slightly more airflow, and moisture-loving ferns toward the center. This creates a natural microclimate within your stump that mimics their native growing conditions.
Pro Tips for Hollowed Out Tree Stump Planter
- These practical tips will help you transform your stump into a thriving, long-lasting garden feature with minimal has...
- Drainage Design: When creating those at least 4 drainage holes in Step 1, space them strategically—place two on oppos...
- Texture Tip for Root Grip: The rough-up step in Step 1 isn't just about aesthetics—it's about creating micro-crevices...
Frequently asked questions
Got questions about transforming a hollowed-out tree stump into a stunning planter? You’re not alone! Here are answers to the most common queries to help you get started with confidence.
What’s the best time of year to hollow out a tree stump?
The ideal time is late fall or winter when trees are dormant. This minimizes stress on the tree and gives you enough time to plant before spring. Avoid doing it during active growing seasons (spring/summer) to prevent damage or disease.
Can I use a power tool or should I stick to hand tools for hollowing?
Both work, but hand tools like chisels, drills, and saws give you more control and reduce splintering. Power tools (like a chainsaw or circular saw) speed up the process but require caution. Wear safety gear—gloves, goggles, and a dust mask—to protect yourself from debris and fumes.
What plants thrive in a hollowed-out stump planter?
Opt for moisture-loving, shallow-rooted plants like ferns, mosses, or small succulents. Avoid heavy feeders (e.g., tomatoes or pumpkins) since the limited soil volume drains quickly. For a lush look, try fittonia (nerve plant) or heuchera (coral bells)—they love the cozy, humid environment.
What if my stump starts rotting or smells bad after planting?
Rotting is normal, but foul odors mean excess moisture. Drill drainage holes at the bottom if you didn’t already, and mix in perlite or sand to improve airflow. Avoid overwatering—let the soil dry slightly between waterings. If mold appears, remove affected soil and replant with fresh, sterile potting mix.
Are there alternatives if I don’t have a dead stump?
Use a large ceramic pot, a repurposed wooden barrel, or even a hollowed-out log section. For a similar rustic vibe, try a self-watering planter with a decorative outer shell. Just ensure whatever you choose has drainage holes to prevent root rot.
Wrapping up and next steps
Transforming a hollowed-out tree stump into a planter isn’t just creative—it’s a way to breathe new life into nature’s artistry! Whether you’re a seasoned gardener or a DIY beginner, this project blends sustainability with charm, turning an old stump into a living centerpiece for your garden. 🌿✨
Ready to take the next step? Grab your tools, pick your plants, and let your imagination grow—your garden (and future pollinators!) will thank you. Happy planting!