
Propagation
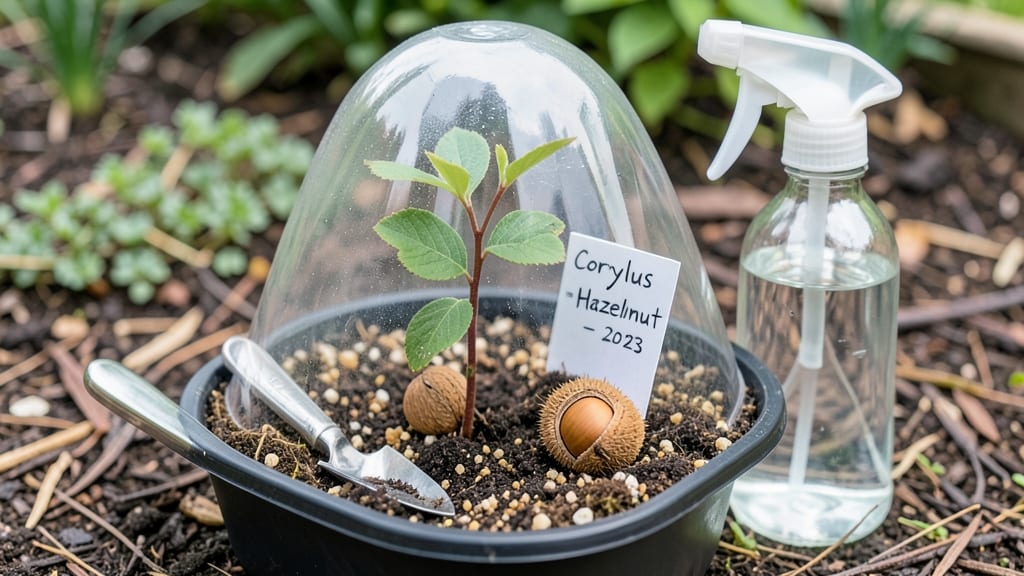
Growing a hazelnut tree from a nut is like unlocking a slow-motion time capsule—those first green shoots emerge after months of patience, but the payoff is worth every cold, damp week. 🌱 The secret lies in cold stratification, a process that mimics winter’s natural conditions to trick the nut into thinking it’s time to grow.
I’ve sprouted dozens this way, and the best part? You don’t need fancy equipment—just a little refrigerator space, some potting mix, and a watchful eye for the right moment to plant outdoors. Start with fresh, plump hazelnuts (store-bought ones work too, if they’re unshelled).
After removing the husk, soak them in water for 24 hours to soften the shell, then place them in a damp paper towel or vermiculite inside a sealed bag. Pop this in your fridge for 6-8 weeks, checking occasionally to keep things moist but not soggy.
That’s where the magic happens—the cold breaks dormancy, setting the stage for roots to form before the nut even thinks about sprouting. When you finally see those first pale, fuzzy roots (usually around week 6), it’s time to plant.
Use a small pot with well-draining soil and bury the nut 1-2 inches deep, leaving the top exposed. Keep the soil consistently moist, and within 2-4 weeks, you’ll spot a tiny shoot breaking through.
This is where the real adventure begins—your seedling will need full sun, regular watering, and protection from pests like voles, but the journey to that first harvest (yes, it takes 5-10 years) starts with this tiny, determined sprout.
Here’s the thing—most people quit at the germination stage, but that’s when it gets interesting. Your seedling’s first year will focus on roots and leaves, not nuts, but by year 3, you’ll start seeing catkins (those fuzzy flower clusters) and, eventually, tiny green husks.
The real test comes in winter: young trees need mulch and wind protection to survive their first freeze. And yes, you’ll need to pollinate by hand if you want nuts—hazelnuts are either male or female, and most homegrown varieties need a partner tree within 50 feet to set fruit.
Troubleshooting is part of the process: slow germination? Try a longer cold period. Moldy nuts? Rinse and dry them before refrigerating. Pests? A chicken wire cage around young trees works wonders.
The timeline might feel long, but every gardener who’s grown a hazelnut from scratch knows the satisfaction of cracking open a nut you nurtured from a single seed. It’s not just a tree—it’s a legacy, one that’ll keep giving for decades.
📚 In This Guide
- What you need
- Instructions
- Tips and common mistakes
- Wrapping up and next steps
What you need
- ● Fresh hazelnuts: 3–5 healthy, unroasted nuts (preferably from a local, disease-free source). Pro tip: 💡 Choose plump nuts with intact shells—avoid shriveled or cracked ones!
- ● Cold stratification supplies: 1 small plastic bag (resealable) or a paper towel
- ● 1 container with damp peat moss, perlite, or vermiculite (or a mix)
- ○ Optional: A spray bottle for moisture control
- ● Planting containers: 1–2 small pots (4–6 inches wide) with drainage holes
- ● Potting mix: Well-draining soil blend (e.g., 50% peat moss, 30% perlite, 20% compost)
- ● Growth tools: 1 small hand trowel or spoon
- ● 1 spray bottle (for misting)
- ○ 1 plastic wrap or humidity dome (optional, for early stages)
- ● Refrigerator or cold stratification setup: A space at 34–40°F (1–4°C) for 6–8 weeks.
- ● Sunlight: A bright, indirect light source (e.g., a sunny windowsill or grow light).
- ● Patience: Hazelnuts can take 4–6 weeks to sprout after stratification!
- ● Growth hormone gel (to speed up germination, if needed)
- ● Soil moisture meter (to monitor dampness without overwatering)
- ● Labels or markers (to track planting dates)
- ● Outdoor space (for transplanting after sprouts reach 6+ inches)
Step-by-step instructions for growing a hazelnut tree from a nut
Here's the proven method I use to break dormancy and coax strong sprouts from fresh hazelnuts.
🌱 Step 1: Select and Prepare the Nuts
Choose plump, undamaged hazelnuts that have fallen naturally from the tree—store-bought nuts often won't sprout. Remove any nuts still attached to their husks and let them dry completely for 3-5 days in a warm, dry place. This mimics natural conditions and prevents rot during stratification.
I like to soak the nuts in lukewarm water for 24 hours before stratification. This softens the hard shell slightly and jumpstarts the germination process. After soaking, let them dry again until the outer shell feels slightly rough to the touch—this ensures they won't mold during cold treatment.
❄️ Step 2: Cold-Stratify for 6-8 Weeks
Place the nuts in a sealed plastic bag with a damp paper towel—just enough moisture to keep it slightly damp, not soaked. I fold the towel to create pockets for each nut, preventing them from touching. The key here is maintaining 35-40°F temperatures, which mimics winter conditions and breaks dormancy.
Store the bag in your refrigerator's crisper drawer (not the freezer) and check weekly. If the towel feels dry, mist it lightly with water—moldy nuts won't sprout. After 6-8 weeks, you'll see a tiny white root emerge from the base of the nut. This is your cue that stratification worked!
🌱 Step 3: Plant the Stratified Nuts
Fill small pots (about 3-4 inches deep) with a mix of 50% potting soil and 50% perlite for drainage. Plant each nut 1 inch deep, root-side down, in its own pot. The root should point downward—if unsure, plant on its side and it will orient itself naturally.
Water gently until moisture seeps from the drainage holes, then place the pots in a warm (65-70°F) spot with indirect light. A sunny windowsill works well, but avoid direct sunlight at first—young sprouts can scorch easily. Keep the soil consistently moist but never soggy; I water when the top inch feels dry to the touch.
☀️ Step 4: Provide Light and Care for Sprouts
Once sprouts emerge (usually 2-4 weeks after planting), move them to bright, indirect light. You'll know they need more light when they stretch toward the window—this is called "etiolation" and weakens the stem. A grow light 4-6 inches above the plants for 12-14 hours daily prevents this.
When the first true leaves (not the initial seed leaves) appear, you can fertilize lightly with a balanced, water-soluble fertilizer diluted to half strength. Over-fertilizing now can burn tender roots. Watch for yellowing leaves—this usually means too much water or not enough light.
🪴 Step 5: Transplant and Harden Off Seedlings
After 8-12 weeks, when seedlings reach 6-8 inches tall and have 4-5 leaves, it's time to transplant. Choose a location with partial shade and well-draining soil. Hazelnuts hate soggy roots, so amend heavy soil with compost or sand.
Dig a hole twice as wide as the root ball but only as deep as the container. Gently remove the seedling, loosen any circling roots, and place it in the hole so the top of the root ball sits 1 inch below soil level. Backfill with soil, water deeply, and mulch around the base to retain moisture.
Tips & tricks for growing a hazelnut tree from a nut
These insider tricks will help you maximize your success with cold-stratified hazelnut sprouts—no green thumb required.
Nut Selection Insight: The right hazelnut makes all the difference. Look for nuts that are firm, plump, and free of cracks or soft spots. I've found that nuts still attached to their husks when they fall often have higher viability—just remove the husk before drying. If you're unsure about your nuts, test a few by cracking them open: the kernel should be firm and cream-colored, not discolored or shriveled.
Stratification Setup: When creating your damp paper towel layers, think of it like a lasagna—alternate between single nuts and slightly dampened (not wet) paper towels. This prevents mold while maintaining consistent moisture. I like to place the sealed bag in a ziplock container with a small weight on top to compress it slightly—this keeps everything snug against the cold refrigerator shelf. The goal is to mimic winter's natural conditions without creating a moldy mess.
Transplant Timing: The 8-12 week window for transplanting gives you flexibility, but don't wait too long. Seedlings that get too tall before transplanting have weaker root systems. I recommend monitoring their height weekly—when they reach about 4 inches, start preparing your outdoor location. Harden off seedlings gradually by moving them outside for progressively longer periods (starting with just 30 minutes) over 7-10 days before full transplant.
Pro Tips for Grow A Hazelnut Tree From A Nut
- These insider tricks will help you maximize your success with cold-stratified hazelnut sprouts—no green thumb required.
- Nut Selection Insight: The right hazelnut makes all the difference. Look for nuts that are firm, plump, and free of c...
- Stratification Setup: When creating your damp paper towel layers, think of it like a lasagna—alternate between single...
Frequently asked questions
Got questions?
Growing a hazelnut tree from a nut is rewarding but can raise doubts—especially for beginners! Here are answers to the most common queries to set you up for success.
How long does it take for a hazelnut to sprout after cold stratification?
With proper cold stratification (6–8 weeks in the fridge), your hazelnut should sprout within 2–4 weeks after planting. Patience is key—some varieties take longer, but don’t worry if it’s still dormant; check for moisture and warmth.
Can I grow a hazelnut tree from any store-bought nut?
Not all hazelnuts sprout well! Choose fresh, plump nuts from a local orchard or specialty store (avoid pre-roasted or processed ones). Hybrid varieties (like ‘Ennis’ or ‘Yamhill’) are best for propagation. Store-bought nuts may be treated to prevent sprouting—so source wisely!
What if my hazelnut doesn’t sprout after stratification?
Try these fixes:
- Check viability: Soak the nut in water for 24 hours—if it floats, it’s likely dead.
- Re-stratify: Return it to the fridge for another 2 weeks.
- Test warmth: Place the pot in a sunny window (70–75°F) to encourage growth.
Do I need to pollinate my hazelnut tree for nuts to grow?
Yes! Hazelnuts are wind-pollinated, so plant at least two compatible varieties (e.g., ‘Jefferson’ + ‘Oswego’) 30–50 feet apart. Male and female flowers appear on separate catkins—cross-pollination is essential for nut production.
How big should my hazelnut seedling be before transplanting outdoors?
Wait until your seedling has 4–6 true leaves and is at least 6–12 inches tall. Harden it off (acclimate to outdoor temps) for 1–2 weeks before planting in spring or fall. Choose a permanent spot with well-draining soil and full sun—hazelnuts thrive in USDA zones 5–8.
Wrapping up and next steps
Growing a hazelnut tree from a nut is a rewarding journey that combines patience, care, and a touch of nature’s magic! 🌱 By following these steps—from cold stratification to planting—you’re not just nurturing a seed; you’re cultivating a future source of delicious nuts and shade for your garden.
Once your sapling takes root, keep an eye on it, and in just a few years, you could be harvesting your own homegrown hazelnuts.
Ready to take the next step? Start small: gather more nuts, experiment with different varieties, or even share your newfound knowledge with fellow gardening enthusiasts. Happy growing—your future hazelnut tree is waiting for you! 🌿✨